Showing posts with label little birdie baby shop. Show all posts

Friday, September 9, 2011

Feature Yourself Friday Link Party #16!

Hey Everyone!


I don't know what happened to me last week...but for some reason I completely SPACED our link Party!!!  Sheesh!


So our features for this week are actually from two weeks ago!  I hope you'll all forgive me!!


Our top-viewed link last week was....


This darling Turtle Matching Game from Little Tadpole Designs!
And our runner-up was...


These darling little shoes by Little Birdie Baby


So fun!! 
Thanks for all the great links, everyone, and welcome to the newcomers!!! Now let's get onto this week!!

Feature Yourself Friday will be a place for you to highlight something you've done!! You can link to blog post or tutorial that you've done or a new item in your shop! We want to see what YOU have been up to!!
The only rule for linking up is that you become a follower of our blog and check out a few of the other links shared!! YOU DON'T HAVE TO BE A MEMBER OF OUR TEAM TO LINK UP!!! (Please link up only TWO posts/items each week!)

Please be sure to visit some of the other links and give some love to others!!

Each week we'll pick two or three of the links that stand out to us and feature those here on our blog! It's just a little way to help everyone see what YOU do!!


Let's see whatcha got this week!!!

~ Sarah from Sarahndipities


Wednesday, April 13, 2011

Feature Shop: Wonky Wares

Good morning! Today, meet Jen of Wonky Wares! She is an active member of our blog team -- she makes sure the things we post are proofread and error free! -Cheers! Cori of Peace, Baby! Batiks

What is your name?
Jen

Where are you located?

Wichita, KS, currently, but a native Floridian

Owl Earflap Hat

Tell us a little about yourself.
I'm a SAHM to three precious little boys, and when I'm not chasing them around or crafting, I love to read.

What type of merchandise will shoppers find in your shop?
In my shop, you will find crocheted hats for babies, children and grown-ups; handmade sweeper covers; greeting cards; and much more to come this spring, including baby sandals.

Brimmed Newsboy in Sage with Brown Flower

How/why did you get started?
Wonky Wares began out of my love for crocheting, especially girlie flowered hats and bright colors. Since I'm the only girl in the house, Wonky Wares lets me work with hot pink and lavender yarn and pass my creations on to others.

How long have you been crocheting? Papercrafting? How did you get started in these two crafts?
I've been crocheting for about five years. When I worked in the mental health field, one of our clients taught me a basic stitch, and I was "hooked" after that. I got some books, taught myself some more stitches and how to read patterns, and have enjoyed it ever since! I've been scrapbooking/papercrafting for about 12 years and love how this creative outlet also serves as a functional way to preserve our family's memories.

Reversible, Washable, Eco-Friendly Sweeper Sock

What is your favorite thing to make?
My favorite thing I've ever made was an open weave infant beanie with a big crocheted rosebud on the side. Something about the snowflake blue and winter white just went together perfectly, and the subtle fuzz of the yarn just felt like winter. It was elegant and feminine, and I loved it. I hope it's new owner loves it, too!

What inspires you to create?
I am inspired by bright colors and patterns; I love pairing different colors, and I especially love the spring and summer months when color is all around me!

What is one thing you need to have with you while you craft?
When I'm crafting, I need to have an empty room. I'm easily distracted, especially having three boys under four running around me all day, so when I craft, I like to close the door, put on headphones and just be alone for a little while. Pandora is also a must; preferably set to my Ben Folds station.

Pink Earflap Hat with Tassels and Flower Accent

How do you balance mothering and running a small business?
Figuring out how to balance motherhood and an Etsy shop has definitely been a process. I'm fortunate enough to have little ones that still nap (most days!), so naptime is my dedicated craft/business time. I don't always get to spend as much time as I'd like listing new items, and my "work-in-progress" basket is overflowing currently, but my number one job is motherhood, so I have to take advantage of every minute I can, and learn to cut myself some slack if the day's to-do list doesn't get completed.

What is your favorite thing to browse Etsy for?
Right now, my favorite thing to browse Etsy for is handmade lip balm/solid lotion. There are so many shops out there with some delicious-sounding flavors. I'm definitely in the market, if you have any recommendations!

When you're not crafting, what are you doing?
When I'm not crafting, I'm running after my boys, playing outside, catching up on sleep, or watching documentaries on Netflix with my hubby. Or reading, I love to read.

Cheerful Windmill "Happy Birthday" Card

Where can we find you?
You can find me at wonkywares.etsy.com or on Facebook at facebook.com/wonkywares

What is your favorite shop (not yours) on Etsy currently?
My favorite shop on Etsy has to be Boojiboo (boojiboo.etsy.com) I ADORE her aprons and wear the ones I have all the time. As an often too-casual, covered in crumbs/child goo mom, I love how wearing one of her retro inspired aprons makes me feel pretty, feminine, and dressy. They aren't just for the kitchen, sometimes I wear mine most of the day!

Friday, March 25, 2011

Recipe: Spinach Artichoke Chicken Quesadillas


Spinach Artichoke Chicken Quesadillas

Here's what you need:


1. Tyson Grilled Ready-to-Eat Chicken Breasts
2. Spinach Dip: I get mine from the deli section at HEB
3. Steamable frozen Artichoke hearts
4. Shredded Mozzarella Cheese
5. Large Flour Tortillas
6. Butter

Supplies:
Mixing Bowl
Wooden spoon
Skillet big enough to accommodate tortilla size you chose
Spatula

Ok, so I have to warn you this is one of those recipes that I make just by sort of looking at the way things are turning out. I have no idea how much of each thing I use, but I like my filling substantial with plenty of chicken to keep it meaty! So just watch how things are coming out and add or take away as needed. :)

Warm an empty skillet on the stove on Medium heat. While it's heating, steam the artichokes in the microwave according to package instructions. Then, warm your chicken in the microwave according to the package instructions. Chop chicken and artichokes into small pieces so everything blends well. Add to mixing bowl. Add a couple of spoons of the spinach dip to your chicken and artichokes and stir until it looks like the portions are pretty equal. Add shredded cheese to mix until you are pleased with the cheesiness of the mix. :)

Butter one side of 2 tortillas. Place your first tortilla butter side down in the skillet. Spoon mixture onto tortilla and top with unbuttered side of 2nd tortilla. Flip when bottom is brown and toasty and remove from skillet when 2nd tortilla is also brown a toasty. Mix inside should be melty and bubbly. Cut into slices and serve! Repeat it necessary... and it's usually necessary!!


...

I hope you all get a chance to try out this dish and come tell me how you liked it. It's one of my favorite easy dinner ideas!!

Oh yeah, and please think happy thoughts for my internet!! Without it, I feel like I'm missing an arm!!

XOXO

Tuesday, March 22, 2011

Tutorial Tuesday: Eli Elephant by Little Birdie Baby Shop

Happy Tuesday! Or Happy Tutorial-ing... uh? Not sure if that one works, but in any case I'm happy to have you here this Tuesday. I'm really excited about today's tutorial because it's the first one I've done start to finish without an outside pattern or anything. And he's just so stinkin' cute!


Meet "Eli"
He's an elephant, just waiting to meet your little one. 
{even if your "little one" is a dog, it's still a fun project!}


OK, here's what you need:

12"x12" fabric of your choice
needle & thread or sewing machine {I used to be a needle & thread-er, I feel ya guys!}
coordinating piece of felt, or felt scraps
polyfill


Start by pressing out your fabric so it's nice and smooth...


Then, fold your fabric in half with the right sides facing each other.
Draw your elephant shape. He doesn't have to be perfect, he's plush!


Next, sew all around your outline. 
I used the wonky looking zig zag, but I like to see the thread on the outside all "rustic style."
I would suggest pinning your fabric together so everything stays straight.
 {I didn't pin but I used flannel, and it sticks to itself pretty well.}


Be sure to leave an opening to turn inside out. {see pin}
I like to use the space at the bottom because it's less noticeable when you have to sew it back up.


Now cut out your shape! 
I use pinking shears to keep things from fraying {just in case}, 
aaaaand I like the way the little zig-zaggy edges look. Never said I wasn't a dork!


Now get to turning!
{I find that it helps to start by pushing the trunk out first, since it's furthest from the hole.}


Now it's time to stuff him! 
I got this little chopstick-y thing in a bag of polyfil, I'm pretty sure they all come with one, but you can use a chopstick or even a pencil to help get the stuffing in all the little corners and crannies.


Ta DA! All stuffed and ready to sew. I don't usually stuff them too full, just because little baby hands can grab on and chew on it a little better when it's not sooooo full.


I don't know if this stitch has a name, but I stitch in kind of an X pattern. 
It's easy, sturdy, keeps the fabric flat when I'm finished, and goes along with my other rustic edges.


Now for the ears...
Cut ears from your scrap of coordinating felt. 
Mine are about 2 inches long, and just kind of floppy looking and oval shaped.


You can sew these on and they'll turn out great. 
However, I do something a little different...I use embroidery floss 
{because it's heavier duty and you won't run the risk of those sweet little baby hands pulling an ear off} Loop it all the way through the elephant to the other side so his ears are "tufted" to his head like a pillow.
Just pin both ears down to it's head, and it will be easy-peasy.


And here you are! A little Eli the Elephant of your very own. 
{Of course, you can always make him girly and name her Ellie. I don't mind. :) }


OH wait!! 
And if you partner him up with a matching burpie, bib, and jingle block, 
you've got yourself a rockin' baby shower gift set in no time flat! ;)


I hope you all enjoyed this week's tutorial! If anyone makes their own Eli/Ellie, be sure to show me! I love seeing what everyone's adaptations are. :)

Come link up your projects for the week below, I can't wait to see what you've been working on!! Feel free to grab a button if you're linking up!


XOXO


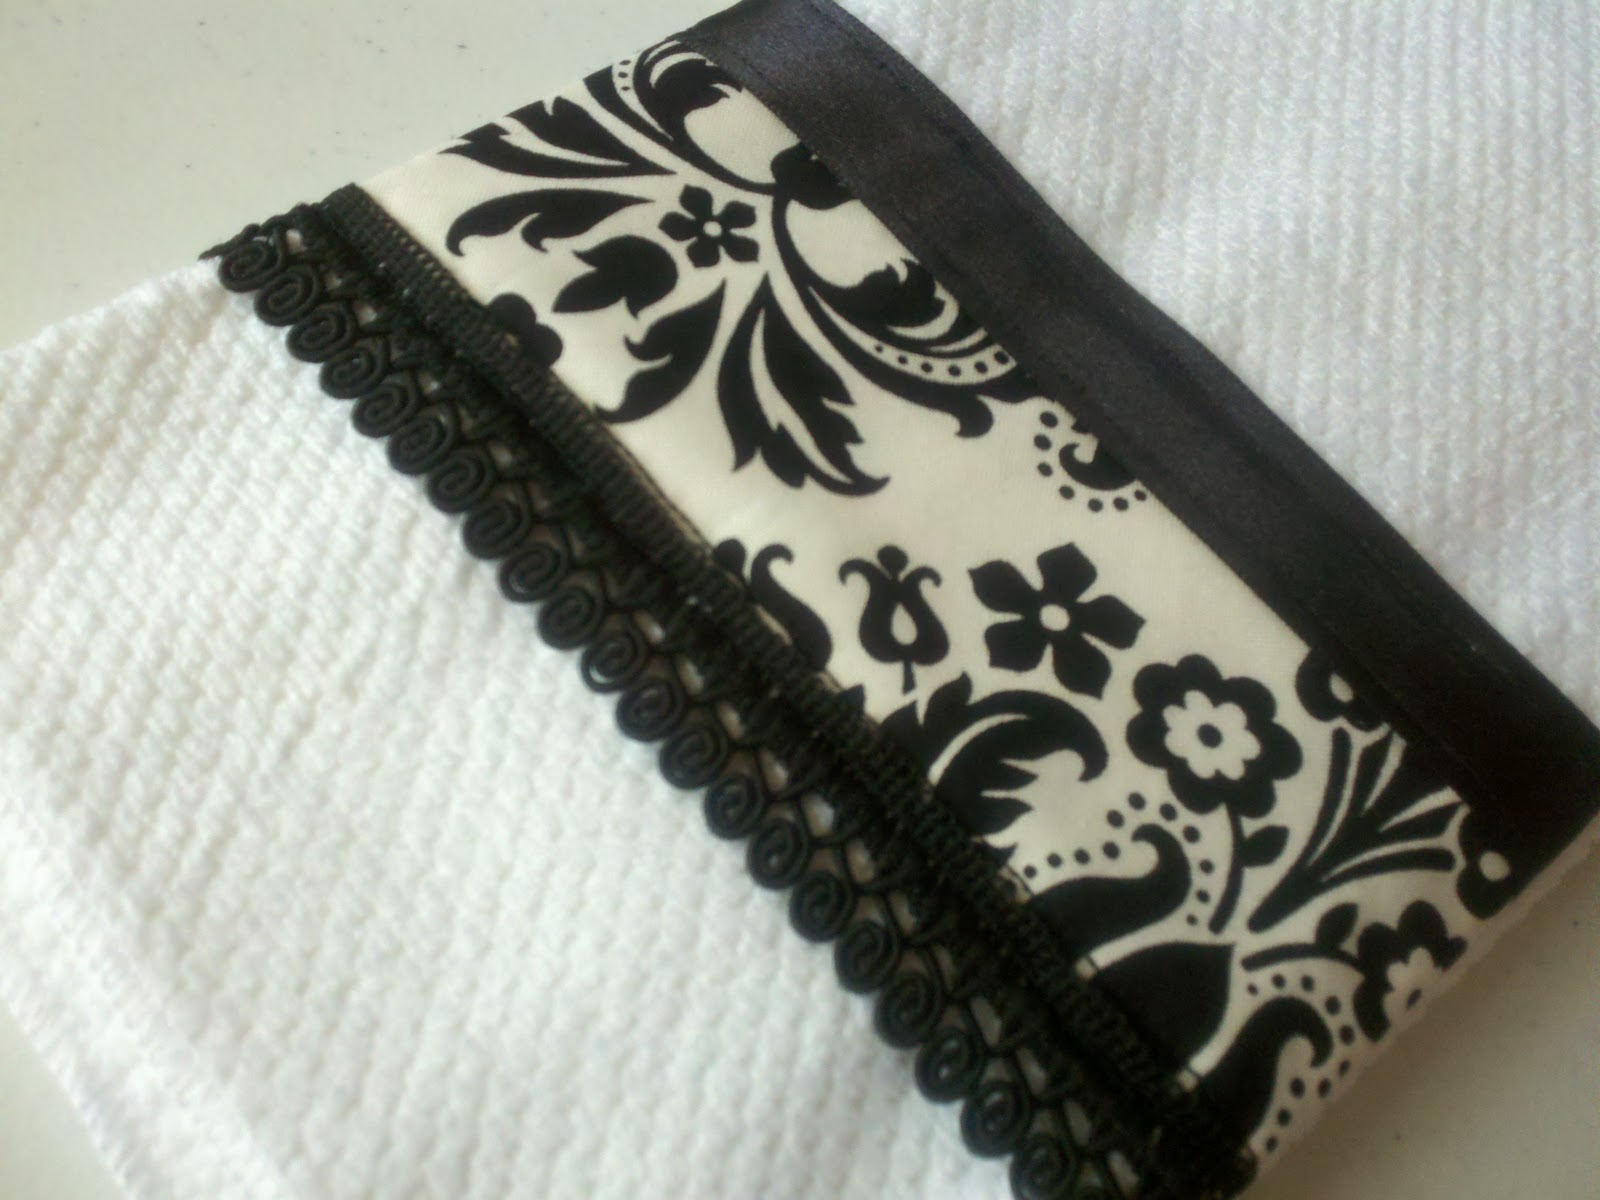
Tutorial Tuesday: Embellished Hand Towels by Little Birdie Baby Shop

I have new towels for my kitchen!


Maybe that doesn't sound like a big deal, but I can never find anything that I like that matches my kitchen. First of all, it's cherry red {already painted when we moved in} with kind of a hodge-podge of mismatched appliances, and ugly cabinets to top it off... so I have trouble accessorizing. Secondly, truth be told - I'm picky. It can get ridiculous at times. I still don't have a matching set of bath/hand/wash towels for the master bath because nothing I've come across speaks to my splishy-splashy side. 
Eh, all in good time I guess. HAHA!

I'm getting off topic, sorry! 

So I'm excited about my little kitchen towels! 
There's only one thing that could make this whole scenario better, and that's if I had made them. 
Oh wait! I DID! Yay me!

P.S. The whole project cost under $2 to make {that's less than $1 per towel!!} 
Now that's a winner in my book!

And because I love you all so much I whipped up a little tutorial so you can make your own fancy pants towels using a couple of scraps and your pocket change. Let's get started!


~ Dressed Up Hand Towels ~

Wal*Mart, 2 pack, $1.68. 
SCORE!


My fabric was a little scrap left over from a jelly roll, ribbon was a scrap from my white felt wreath, and the lace stuff a scrap from a ribbon scrap pack I bought at Hobby Lobby ages ago. You don't need much of anything to do this project, these particular towels are only 15" wide to give you an idea.

First, lay your pieces out across the short side of your towel to make sure they are long enough with a bit leftover at each end to fold under and hem. I left about an inch on each end.


I started with my fabric since I knew I wanted it on the bottom. I planned to sew the ribbon and the lace over the top of the raw edges of the fabric so I wouldn't have to do any more hemming than necessary.

I folded under and pinned the edges down first, then used the wonky little zig-zag stitch 
to attach it to the towel. Clean edges, pretty little ziggy zaggy.


Next, I pinned and basted down the long edges. I know I'm going to be attaching the ribbon and lace 
over the fabric, so I mostly just need it to stay down and in place. The real reinforcing will come later.


Now more pinning for the lace...
{what is that stuff? Seriously, I have no idea what to call it, so I'm just going with lace for now.}
And again with the wonky zig zag stitch to make sure this stays in place and can be machine washed.


I did the same thing for the ribbon on top that I did for the fabric: 
Pinned and basted on both the top and bottom long edge. 
Somehow I managed to miss taking the pic on this one so you'll just have to use your imagination, haha!

Iron out any wrinkles, and ta-da! Pretty little dish towel!


They're SO easy, and you already have an extra towel, so why not make it two?


 Two is better than one anyway, I think. :)


Since I made these two, I've been digging around in my scrap box for other coordinating colors to make more. I could seriously solve my entire house-wide towel problem with what I find in my scrap box. :) 
But wouldn't they make great gifts? Housewarming parties, hostess gifts, wedding shower... 


Now let's see what you've been working on this week! I'm excited that our little linky party is growing, thanks to you all for participating and spreading the word. Don't forget, once we have at least 10 link ups I'll do a Saturday post featuring my favorites from that week. 

Grab yourself a button if you're linking up this week, and you can find all the parties I'll be linking up to this week up top under the "linky parties!" tab. There's lots of great spots on that list so definitely go check them out, and let me know if you have a party that I can add to my list!


<a href="http://littlebirdiebaby.blogspot.com/"><img src="https://blogger.googleusercontent.com/img/b/R29vZ2xl/AVvXsEiY_p9bvaD6CdwiCFXPbz0MGh6kEkqVzzr2ovopohVMwd4Dq_ZncBIUKVweV-jGuarGp2q-Da53DpMKiNimRXIgDDy9FPAZPWRTu3GGUiql1KLR2eg5codRy9Nl7lblV05jCn-HGRKu65KQ/s144/Tute%20Tues%20LB.png" height="144" width="144" /></a>


XOXO

Monday, February 14, 2011

Top Ten Craft Show Tips

The spring craft show season is upon us, so it's no wonder that our team has been abuzz with people asking for craft show tips. Our team is full of wonderful ladies who have all sorts of experience working craft shows. Some have done only one, but a few are participants in the regular show circuit in their area!

I've taken the top ten most common ideas and compiled them into a nice little list for you all! Several members also included pics of their wonderful booth spaces! Hopefully they can inspire you all.

1) Have a checklist of things you'll need for the show. There's nothing worse than forgetting something! Brandie at My Silly Blue Hippo posted a great checklist on this forum thread


Rachael at Little Birdie Baby Shop did an Awesome job displaying each product in an interesting and inviting way.  There's no digging through to find something.  


2) Consider your options for accepting payments. The consensus seems to be no checks. Unfortunately, you just never know who will write you a hot check. So that leaves you with cash and credit cards. A few have commented on the little wonder that is the Square credit card reader (www.squareup.com). The thing is amazing, and a very inexpensive way to accept credit cards. All you need is a smart phone with the app on it, and the free credit card swiper! You also need to consider giving out receipts. I'd say most buyers may not want a receipt, but you need to be prepared to give one just in case. You can get an inexpensive receipt book at an office supply store. Don't forget somewhere to put the money. Lora from ButternutBoutique recommends wearing an apron with pockets to keep money in!

3) This one will be on your craft show checklist, but it's so important I'm including it here. You NEED your promotional materials!! Business cards, post cards, flyers, and anything else with your business information on it. You'll have a lot of people stop by your booth and not buy, but if they have your promo things, they can buy online in the future. I also suggest custom order forms, if you take custom orders, and an e-mail list sign-up sheet.


Love how this booth set-up by Little Owl's Nest offers various levels of display.  It looks warm and inviting!
4) Plan your display. Get information about how large your space will be and plan how you want to lay everything out. It's inevitable that you won't be able to do everything exactly the way you want, but having a plan will help you get everything set up much more quickly and easily. Some people even set up everything before the show to be sure it looks good. (And, you may even snap a picture of this early run-through as a reference, to help your show morning set up go faster) Make your display as eye-catching as you possibly can. You don't want people walking right past you. Try to create different levels to your display. Having everything flat on the table is boring and will do nothing to get anyone in your booth.  Many people suggest to have everything very clearly priced.  I found that I did better without having the signs up.  

5) Network with other sellers. Get to know the other sellers at the show. The last show I did I was placed right beside "the monogram lady." I can't tell you how invaluable it was to have talked with her there. She sent several people to my booth to get things she didn't have, and I sent my people to her to have things monogrammed. Until I get an embroidery machine, I'll always send people to her to have things monogrammed. You might also be there by yourself and having someone to talk to will make it MUCH better.

This display set up by Dirty Deeds Soaps is warm, inviting, and well organized.
She has represented her brand well!
6) Know the show before you go. You won't always be able to attend the show before you sign up, but you can get an idea for how it will be. Some good things to know are: How many shoppers are expected? How many vendors? Is it open to all types of vendors or just to crafters? Crafter-only shows tend to be better for handmade. If you are able to, attend beforehand, then pay attention to which type of items people seem to be gravitating. It may just not be the type of show you should be in. After you sign up, be sure you know the rules for sellers. Sometimes you'll need to offer a door prize. You might need floor length table cloths. Heck, they might even require that you stand on your head for 10 minutes out of every hour. You need to know, so that you don't break the rules and can get the deposit back.

7) Look like you love being there. I hate getting a rude, unhappy cashier at Walmart, whose only connection to the product is scanning the barcode. It would be way worse if the person was selling things made by their own hands. People want to buy from someone they can relate to. Lora from ButternutBoutique advised, "the more personable/friendly you are, the higher your sales volume will be. My friend and I noticed that the more (genuine) compliments we handed out (about a buyer's outfit/kid/jewelry/etc.) the higher the likelihood of a sale. It was unreal!!" Don't just sit there reading a book, or gazing off to la-la land. Be engaging and people will be jumping at the chance to buy something from you!


Lora from Butternut Boutique looks very comfortable, friendly and stylish here!
 I love the way the booth set-up adds interest! 
9) Know your product, or maybe it should be know what people want to hear about your product. Be armed with little tidbits of information that might make a buyer more likely to purchase something. Think about things you might see on a package if the item was for sale in a store. What uses does it have? What size is it? What makes it different from similar products?

10) Keep yourself comfortable. No one wants to buy from a slob, but you will be on your feet all day. If possible, wear something you make. You want to represent your brand well. If you sell high-end jewelry, wear some, and dress like you're selling jewelry on Fifth Avenue. If you're selling boutique baby items, look like a stylish mom that people want to be--you know you have "that" friend who has 10 kids and is always so put-together. The great thing about buying handmade is that people want to know the maker, so make sure your represent yourself well.


Celesa Jackson- Blog team leader
Lilly Bunns Boutique

Wednesday, February 9, 2011

Feature Shop: Little Birdie Baby Shop

Each Wednesday here on the blog, we'll introduce you to a different member of the SAHM of Etsy Team. Today, I'd like you to meet Rachael, the woman behind the adorable Little Birdie Baby Shop and the gorgeous design of this blog! -Cheers! Cori of Peace, Baby! Batiks

Rachael and her husband
What is your name?
Rachael

Where are you located?
I am located in Texas, down in the Houston area

Tell us a little about yourself.
I am 29 (no, seriously... I'm not just saying that because I'm 35, haha!), married to the most wonderful man who also happens to be my best friend. We just had our first baby this summer, and she is growing so fast we can hardly keep up with her! I, of course, am a stay-at-home mom working on building my little business and keeping busy with anything crafty I can get my hands on!

What type of merchandise will shoppers find in your shop?
My shop is currently carrying batik-style tye dye onesies for both boys and girls. Each one is hand designed and drawn by me! In the next few weeks I will also be introducing designer burpies, bibs and gift sets!

Green Tye Dye Sea Turtle Onesie


How/why did you get started?
Before my daughter was born, I worked outside of the home, and was what some would call a "workaholic." Most of the time I enjoyed it, because I felt it had a purpose and a direction. Since Baby A came along, things have changed drastically for me. She is the center of the universe and my husband and I really felt it was important that she have as much one-on-one parent time as possible. However, for me, it was a difficult transition going from that much "work" to being at home. I had alot of creative energy I needed to burn through!! That, coupled with the fact that I really wanted an unconventional outfit option for baby clothes, spawned the idea of my onesie designs. Baby A is my biggest inspiration, and her abundance of cuteness keeps me creating every day! :)

How long have you been crafting?
I've been crafting for as long as I can remember. My parents have been picking paint, beads, glue gun goo, paper scraps and straight pins out of their carpet for years. And now my husband does it, haha!

Purple Batik Sunflower Tye Dye Onesie


What inspires you to create?
My daughter first, but I truly draw inspiration from everything around me. I have fallen in love with the Etsy and blogging world because there are always new ideas and inspiration to be found amongst all these amazing artists.

What is one thing you need to have with you while you craft?
Paper towels. No kidding! I am a mess, but I hate it when my work space is messy, so I'm a super nerd who cleans up constantly as I go. ;) That and sound ... sometimes it's baby playing, sometimes it's the news, but most of the time it's whatever music playlist I'm currently addicted to.

Grey and Pink Heart Flower Oneise


What is your favorite thing to browse Etsy for?
Baby stuff!! I don't know what it is about having a baby, but it's like I can't get enough of the baby stuff. Clothes, dress up, room decor, toys ... there are just so many amazing things for baby on Etsy.

When you're not crafting, what are you doing?
Spending time with my family. My hubby has his own business as well, so he's always busy like me. When we get time "off" we always spend it together. :)

Pink Cherry Blossom Tye Dyed Onesie


Where can we find you? (Etsy link, blog, Facebook, Twitter, stores, etc.)
On Etsy: www.littlebirdiebabyshop.etsy.com
On my blog: www.littlebirdiebaby.blogspot.com
On Facebook: www.facebook.com/pages/Little-Birdie-Baby-Shop/102864613111139
At Stoopher & Boots in NYC: stoopher.bigcartel.com/about-stoopher
And several online boutiques. :)

What is your favorite shop (not yours) on Etsy currently?
I am really in love with WildMotherArts (www.etsy.com/shop/WildMotherArts). She has beautiful handmade jewelry for women in all walks of life. I have some friends struggling with conceiving, and WildMotherArts has the most beautiful fertility bracelets made from natural gemstones that are perfect for inspiring hope.

Celtic Cross Navy Tye Dye Onesie