Showing posts with label tutorial. Show all posts

Tuesday, October 18, 2011

Tutorial Tuesday - Glowing Spider Decorations by Peacebabybatik

I think this is a perfect tutorial to post for this week with Halloween is just around the corner!  My girls and I went and got the supplies yesterday, and we are going to make them after school tomorrow.  Fun! Thanks Peace, Baby! Batik

Glowing Spider Decorations


A few weeks ago, little guy and I were wandering around a big-box home improvement store looking at their Halloween decorations. We became enamored with some tinsel spiders, but they were too pricey (in my opinion) to buy too many of them.
So, we decided to make our own spiders, an idea that fit well with my husband’s plan to go all out for Halloween this year.
Any by all out, I mean, all out. Our house is going to be something else this year! I can’t wait to see it all put together. We’ve got lights and ghosts and pumpkins, of course. But, that’s not enough. Oh no — he’s got a fog machine and built a contraption to cool the fog so it settles on the ground, and he is rigging up some electronic wizardry to make it look like thunder and lightning.
Don’t let me forget about the black lights, which is where these little guys come in.

Here’s what you need:
  • Styrofoam balls in whatever size you choose
  • Paint (we used neon orange, neon yellow and black)
  • Pipe cleaners
  • Googly eyes
  • Hot glue gun

Paint the spiders your desired color(s). If you’re lighting them with a black light, go for neon colors so they glow.
The balls need more than one coat to completely cover the Styrofoam. Let the paint dry completely between coats. Little guy had limited patience for so much painting, so I added the later coats on my own.

When the balls are dry, cut pipe cleaners in half for legs. Poke them into the Styrofoam and then bend them to look like legs with feet. Before we hang ours outside, I am going to go back and glue in the legs so they don’t fall out.
Cut another pipe cleaner in half and twist it into a loop. Poke it into the top of your spider to make a hole. Remove the loop, and fill the hole with hot glue. Poke the loop back in.

Glue on googly eyes, and find a great place to hang them.

Happy Halloween!

Tuesday, September 20, 2011

Tutorial Tuesdays: Crochet Hobo Bag

Today's tutorial comes to us from Sarah at Sarahndipities....

The HOBO BAG!


I really love that way it turned out!


Material Needed:
Size K crochet hook
A bunch of Cotton yarn (I used a large skein of Bernat Handicrafters, and one skein of Lily Sugar and Cream...sorryI didn't take the time to keep track of the amounts!)
Tapestry or yarn needle
Scissors

Abbreviations:
sp = space
st(s) = stitch(es)
beg = beginning
sk = skip
sc = single crochet
dc = double crochet
dctog = dc together (a decrease st)
sl st = slip stitch

Pattern is written in Standard American Terms
***NOTE***
This pattern has NOT been tested...so if you find any errors, feel free to leave suggestions in the comments below!

Crochet Hobo Bag

Ch 41.
Row 1:  Sc in 2nd ch from hook. Sc in each ch across. (40 sts)
Row 2 - 12:  Ch 1, turn.  Sc in each sc across.
Row 13:  Ch 1.  Do NOT turn.  Working along end, work 12 sc evenly.  At corner ch 1, sc in same sp.  Working along beginning edge, work 40 sc evenly to end.  At corner ch 1, sc in same sp.  Working along end, work 12 sc evenly.  At corner ch 1, sc in same sp.  Working along next edge, sc 40 evenly to beg.  Join with sl st to first sc.
Row 14:  Ch 1. Working in back loops only, sl st around, chaining 1 in each corner.  Join with sl st to beg ch.  This creates the rectangular base of the bag.


Base of bag


Row 15:  Ch 1, turn.  *Sc in next 40 sts.  Sk corner.  Sc in next 12 sl st.  Sk corner.*  Rep from * to * one more time.  Join with sl st to beg sc.
Row 16 - 18:  Ch 1, turn.  Sc in each sc around. Join with sl st to beg.
Row 19:  DO NOT TURN.  Ch 3, dc in next 11 sc.  Sk next sc.  Dc in next 38 sc.  Sk next sc.  Dc in next 12 sc.  Sk next sc.  Dc in next 38 sc. Sk last sc.  Join with sl st to beg ch.  DO NOT TURN.
Row 20 - 34:  Ch 3, DO NOT TURN.  Dc in next dc, and in each dc around.  Join with sl st to beg ch. 
Row 35:  Ch 3, DO NOT TURN.  *Dctog over next 2 sts.* Rep from * to * around.  Join with sl st to beg ch.
Row 36 - 40:  Ch 1, DO NOT TURN.  Sc in same st.  Sc in each st around. Join to beg with sl st.


For Strap:


Row 1:  Sl st in next 6 st.  Ch 1, sc in next 8 sts.  Ch 1, turn.
Row 2 - 50 (Or however long you want the strap to be!):  Sc in each sc across, Ch 1, turn. On last row, fasten off, leaving a long tail of yarn.
Using needle, st strap to opposite side of bag with whip st.  Fasten off, weave in ends.


NOTE:  The base of my bag measures about 14.5" x 4" and it's about 14" tall, not including the strap.  I switched color on my bag on row 29 to add some contrast.  I also added a simple crochet flower as an accent.


Original post HERE.

Thanks so much for stopping by!
Monika, My Lovebug Baby

Tuesday, August 30, 2011

Tutorial Tuesdays: Crochet Pennant Bunting

Today's post comes to us from Sarah @ Sarahndipities: Crochet Pennant Bunting Pattern


As promised here is the pattern for my crocheted pennant bunting garland!

I've made these using different kinds of yarn and it always turns out great!

CROCHET PENNANT BUNTING


Materials Needed:
Small amount of yarn  (I used Caron Simply Soft and Bernat Satin)
crochet hook size I (or larger or smaller depending on the look you want)
Scissors
Yarn needle

Abbreviations:
ch = chain
sc = single crochet
dc = double crochet
sl st = slip stitch
sp = space
st(s) = stitch(es)


Row 1:  Ch 4.  2 dc in 4th ch from hook.  Ch 3, turn.  (3 dc)
Row 2:  1 dc in bottom of ch.  1 dc in next 2 sts.  Ch 3, turn.  (4 dc)
Row 3:  1 dc in bottom of ch.  1 dc in next 3 sts.  Ch 3, turn.   (5 dc)
Row 4:  1 dc in bottom of ch.  1 dc in next 4 sts.  Ch 3, turn.   (6 dc)
Row 5:  1 dc in bottom of ch.  1 dc in next 5 sts.  Ch 3, turn.   (7 dc)
Row 6:  1 dc in bottom of ch.  1 dc in next 6 sts.  Ch 3, turn.   (8 dc)
Row 7:  1 dc in bottom of ch.  1 dc in next 7 sts.  Ch 3, turn.   (9 dc)
Row 8:  1 dc in bottom of ch.  1 dc in next 8 sts.  Ch 3, turn.   (10 dc)
Row 9:  1 dc in bottom of ch.  1 dc in next 9 sts.  Ch 3, turn.   (11 dc)
Row 10:  1 dc in bottom of ch.  1 dc in next 10 sts.  Ch 3, turn.   (12 dc)

***I'm by now you've noticed the pattern...you can adjust how big or small the pennant is by adding or eliminating rows.***

Finishing Row:  Work 21 sc in side of pennant to end, with last sc being in the tip.  Ch 2, sc in same sp.  Continuing around, work 20 sc along side of pennant to top.  Fasten off, weave in ends.

Garland:  Ch 40.  Sc in each st across top pennant. Ch 15.  Repeat with remaining pennants.  To finish ch 40, fasten off.


Originally posted HERE.

Thank you Sarah for sharing this wonderful pattern with us!
Monika, My Lovebug Baby

Tuesday, August 23, 2011

Tutorial Tuesdays

Yesterday I was going through my recipe book that holds all the magazine pages that I have torn out or recipes on the back of food labels that I save and I found one that I had never tried, Sausage Ratatouille. It was fantastic!

Sausage Ratatouille

The classic French ratatouille is made by simmering eggplant with other vegetables and herbs. It's often served as a side or appetizer with bread, but our addition of Italian sausage turns it into a hearty meal for cooler months.

Ingredients


  • 3 to 4 links (about 3/4 pound) Italian sausage
  • 4 1/2 tablespoons olive oil
  • 1 medium-size eggplant, peeled and cut into a 3/4-inch dice
  • 2 small zucchini, halved and sliced
  • 1 large onion, quartered and thinly sliced
  • 1 medium-size green bell pepper, halved, seeded, and sliced
  • 2 to 3 garlic cloves, minced
  • 2 cups canned diced tomatoes
  • 1 tablespoon plus 1 teaspoon tomato paste
  • Salt and pepper
  • 2 tablespoons chopped fresh Italian parsley
  • 3 tablespoons chopped fresh basil
Instructions
  1. Bring a medium-size pot of water to a boil. Puncture the sausage links in several places, then cook them at a low boil until they're no longer pink in the center, about 14 minutes. Transfer the links to a plate to cool, then slice them into 1/4-inch-thick rounds.
  2. Over medium-high heat, warm 3 tablespoons of the olive oil in a large, deep skillet or Dutch oven. Add the eggplant and zucchini and sauté them, stirring often, until they are lightly browned but not soft, about 7 minutes. Transfer the vegetables to a plate.
  3. In the same skillet over medium heat, warm the remaining olive oil. Add the onion and bell pepper and sauté them for 3 minutes. Stir in the garlic and sliced sausage and sauté, stirring often, for 3 minutes more. Stir in the tomatoes, eggplant, and zucchini.
  4. Partially cover the skillet and gently simmer the ratatouille for 5 minutes. Add the tomato paste, along with salt and pepper to taste, and simmer 5 minutes more. Stir in the parsley and half of the basil. Serve hot, sprinkled with the remaining basil. Serves 6.
This recipe is from Family Fun magazine.

Tuesday, August 16, 2011

Tutorial Tuesdays

Today's tutorial is brought to us by Tricia at Sweeter Than Sweets!

Women's Tube Top to Toddler Tunic:

Seven years ago, I bought a tube top from Wet Seal. I loved it and I wore it for a little while, but then it sat in my closet for years. A few weeks ago, I finally was ready to admit that I'm never going to wear it again. I decided to get more use out of it by turning it into a tunic for my daughter. Here's a tutorial so you can do it, too!


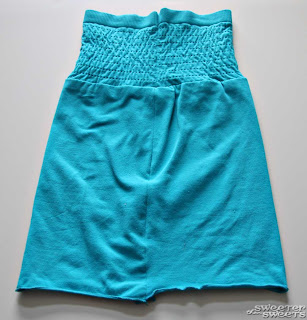
This tutorial is going to give you directions for a tube top like this (stretchy, knit fabric with no seams) along with ideas for adaptations:


You can adapt it to work for your old tube tops or your thrift store finds. Just make sure if you're sewing a knit fabric that you use a ballpoint needle in your sewing machine.

Here's a "before" shot of me wearing it 7 years ago:


First, put it on your little model and using clothespins, clip it to the right size. Don't worry about whether it's done neatly, you're just trying to figure out what the finished length and width should be.


You can also use a store-bought tunic in the correct size to see what the finished measurements should be.

Now lay it out flat to measure the length and width. Right down the numbers somewhere so you don't forget later, then unclip it. We're going to work on getting the width right first, then the length.

(Little Sweets wears 2T or 3T and the finished measurements for her were 16" long and 9" wide.)


Now calculate how many inches you need to cut out of it to get it to the right finished width. Since I wanted to it to measure 9" across when finished and it started out at 17", I cut out 7". I included a generous 1" buffer, just in case my measurements were off (better to cut out too little than too much!).

Like I said, my tube top was seamless, so I got to pick where I wanted the seam to be. I decided it would be in the middle of the back since that would be easier than doing two down the sides. So I cut out the extra 7" from the middle. I used pins to mark where I was going to cut (my tailor's chalk wouldn't write on this fabric or I would've just marked it that way). I hope the picture explains this better:


(If you already have two seams down the sides, you can cut those and the extra material out from the sides to get the right width--in this case it would've been 3.5" from each side.)

Here's another picture to explain this part. On the left you can see where I pinned to get rid of those extra 7". I decided to sew down those lines before cutting because I didn't want the ruching to unravel. On the right, you can see what it looked like after it was sewn:


Then cut out the extra fabric and save it so you can make straps later.


Now, fold it in half lengthwise with right sides together and raw edges aligned. Pin in place and sew to create the seam in the back.


Now it's the right width and we need to work on the length. My tube top had an empire waist so I cut it into two pieces right at the bottom of the ruching. (If your tube top doesn't have details like this empire waist and ruching, the easiest way to do this part would be to cut off some fabric from the bottom and do a simple hem--and you'd be done!)


I wanted the ruched part to be 5" long to get the correct finished length of 16", so I measured and marked with a pin where to cut and sew (remember your seam allowance.)


Now you can sew along the marked line.

Oops! I realized after I sewed it that I did it wrong. Time for the seam ripper (it gets a lot of use in my house).


What did I do wrong? I sewed it like I usually sew quilting fabric, making sure not to pull on it. But this fabric is stretchy and I needed to pull it while sewing to make sure that it would stay stretchy. Here's the right way... see how it's pulled taut? That will allow it to stretch after it's sewn.


(I added this extra step of sewing along the cut edge before I sewed the two parts together to make sure that the ruching didn't unravel. If you know how to sew and your fabric is just a regular cotton/knit, you can skip this extra step.)

Okay now it's time to put the top and bottom together. This next photo shows how to start putting it together, with ride sides facing and the seams aligned:


Tuck the top part all the way into the bottom part and align the cut edges. Since the top is clearly narrower than the bottom, you'll need to do some more stretching as you sew. To do that, first pin where the seams are aligned (in the back) like you see in the next photo. Then pin on the other side (the front). Then stretch it evenly and add a pin on each side. This will show you how much you need to stretch as you sew.


Hope that makes sense. If not, keep your seam ripper handy! Nothing wrong with trial and error when you're sewing. =) When the two parts are sewn together it should look like this and it should be the right length and width:


Go back to the piece you cut out and cut some pieces long enough for straps. You may need to measure your model (or correctly-sized tunic) for this. I chose to gather the ends of each strap to add a little flair so I cut the straps much wider than they needed to be. See Step 2 of this tutorial to learn how to gather if you've never tried it before--it's very easy!


Put the tunic on your model and pin the straps where they should be... Little Sweets sits motionless when the TV is on so I knew that would be the perfect way to get this part done. Just be careful with the sharp pins, especially when you take it off! I liked the idea of cris-crossing the straps since I had long enough pieces of fabric left over.


Flip the tunic inside-out and carefully move the pins to the other side so you can see them as you sew. This photo shows it before I moved the pins to the other side:


Sew above the gathered seam (I sewed in the ditch where the ruching starts in order to hide the seam), then remove the gathering threads and trim the extra material. And here it is:


All done! Now your favorite tube top (or thrifted find!) can have a second life as a cute toddler tunic.


I love the cris-crossed straps in the back.


With the gathered straps, you can stretch them out to make the straps look more like cap-sleeves than tank top straps:


Looks like Little Sweets likes wearing Mommy's old tube top. I hope your little one likes it, too!

Originally posted HERE.

Thanks so much Tricia! We love all your fantastic tutorials!
Monika, My Lovebug Baby

Tuesday, July 26, 2011

Tutorial Tuesdays

This week I thought I would share some crafts that I have found across the web from various sites.
 
 I thought this one would be a good idea for the guests of a tea party to make.
Paper Bowl Hats

 
I really don't know any kids that wouldn't think this was hilarious!
Silly Sunglasses
null

 
If you are planning a camping trip or even a nature hike, this would be nice to make before hand and then the kids can add to it as the trip goes on.
Nature Book

 
For these I think I will use washable finger paints. The color will stay nicely but will wash off my daughter's hands and face.
Tube Animals
toilet roll animals

 
I have tried this before and it was a HUGE hit at a Summer bbq for the kids! Much better than water balloons since they can be used over and over again. Also, less clean up!
Sponge Water Bombs
image

 
I thought this one would be a nice craft if you take several trips. The kids can bring home a rock from each vacation and then make it into a necklace. Maybe even write on the back where it's from. Better than a cheap souvenier from the gift shop.
Rock Necklaces
Rock Necklaces

Originally posted HERE
 
I hope you enjoy some of these great crafts! Good luck and have a great week!


Tuesday, July 19, 2011

Tutorial Tuesday

This week's tutoral comes from Tricia at SweeterThanSweets. Its a great idea to make the hot summer days a little more fun. Enjoy!


She loves these Rainbow Ice Cubes and was so sad when they were all melted. Next time I'll make a bigger batch!


This would be a great kids' summer camp idea. Older kids can have a great hands-on (literally) learning experience about mixing primary colors and the changing states of matter from liquid to ice. Science or Art Class?

Here's what you need to make Colored Ice Cubes:


Color Bath Dropz by Crayola
water
ice cube trays and/or old plastic bowls, bath toys, or anything you can fill up with water
3 large bowls
spoon or ladle
cookie sheet that fits in your freezer

Make sure that your cookie sheet will fit in your freezer before you start this project. You will make life much easier on yourself if you do it now. Also, your plastic "molds" should be cheap and/or old just in case they crack when you drop it on the ground as you're taking it out of the freezer. (I'm speaking from experience.)

The star of the show here is Crayola's Color Bath Dropz. You can buy these at Target or Wal-Mart in the baby bath section for a few dollars. They are non-toxic, fragrance free and are meant for children at least 3 years of age. Obviously, they're meant for the bath and Rainbow Ice would be fun for bathtime, too! But why not add them to your water table or baby pool?


Fill each bowl with about 3 or 4 cups of water. No need to measure but the less water, the more intense the color. This is a good thing, but if you spill on your way to the freezer, you might end up with a blue carpet. Remember these Dropz are intended to be used in a bath tub with much much more water.


After a few minutes, the Dropz will be dissolved. You don't need to use hot water and there's no need to stir.


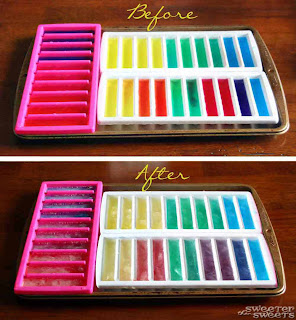
Now put your empty "molds" on the cookie sheet to make it easier to move to the freezer without spilling all over the place. Then, carefully pour some water into each mold. Remember what we learned in grade school about mixing primary colors to make secondary (and tertiary) colors? Just fill it halfway with yellow and the rest of the way with red if you want to make orange, for example. No need to stir.

I filled up each bowl with 2-3 ladles of water and each compartment of the small ice cube tray with 3-4 spoonfuls of water. Don't try to pour your big bowls of water to fill these tiny trays. =)


Then move your cookie sheet into the freezer (see why you want to make sure that cookie sheet fits in your freezer before you start this project?) and wait until they're frozen.

I loved how these little ice cubes looked, but they melted so fast outside that next time I'll probably just do the bowls. The Rainbow Ice will lose a bit of its brightness when frozen, as you can see here:


Once they're frozen, unmold them (you may want to put some warm water in the tray to loosen a bit first). Fair warning: your hands will probably be rainbow-colored when you touch them but it easily washes off.


Then rush outside to play or store in freezer zip-top bags for later. Put them in your little sweeties' water table, baby pool or bathtub and get your camera ready!

Little Sweets really liked the small ice cubes but they melted very quickly.


She was so excited that the water turned purple (Mommy's favorite color)!


The blue star ice cube was her favorite. She was trying to smile for me but holding a large ice cube made that a bit difficult.


I would love to see what shapes and colors you can come up with. Let me know if you make these and show off your pictures!


Originally posted HERE.
Thanks!
Monika, My Lovebug Baby