Thursday, November 3, 2011

Here are some more beautiful treasuries featuring MySweetPotato3!

'It's Beginning To Look A Lot Like Christmas' by CoconutPalmDesigns

Or in my case feel like Christmas. For the SAHM of Etsy Treasury Challenge Featured Shop: MySweetPotato3 ( http://www.etsy.com/shop/MySweetPotato3 )


Elephant Earflap Hat - ...
$25.00

Coffee Cozy and Tea Wal...
$15.00

Crystal Hair Pins - Set...
$11.00

Handmade Baby Bibs - To...
$22.00

Christmas Feather Earri...
$11.00

Red and White Damask Pr...
$3.00

White and Red Hearts Bo...
$3.00

Set of Three Snowman Bl...
$15.00

Ladybug Hair Clip Set -...
$8.50

Sweet Felt Rosette - Ha...
$3.50

Large Bow Headband Fasc...
$8.50

Felt Rosette Flower Hea...
$10.00

Christmas Burlap Bottle...
$36.00

Red and Black Patchwork...
$9.00

Squeaky Rusty Antique R...
$5.00

Christmas Hat Set of 3 ...
$38.00

Treasury tool by Red Row Studio.


'Animal House' by peacebabybatiks

Wild animals from members of the SAHM of Etsy Team!


RESERVED--Gotham Bird B...
$24.00

Turtle Photo Prop - New...
$38.00

Quilted Wall Art - Home...
$15.99

Crochet Fuzzy Bear Hat ...
$15.00

Wood Toy- MATCH ME- Jun...
$12.00

Stuffed Bunny Plush Flo...
$30.00

Elephant Boutique Baby ...
$15.00

Giraffe Print Baby Body...
$10.00

Owl Holiday Ornament - ...
$9.50

Drawstring Pouch Toy Ba...
$10.00

Purple Felt Bird Appliq...
$5.00

Whale Organic Baby Blue...
$40.00

A Sweet Dreamy Applique...
$25.00

Sensory Take Along Blan...
$15.00

Onesie/Little Legs set-...
$22.00

Zebra Print Embellished...
$13.00

Treasury tool by Red Row Studio.


'The Hungry Little Caterpillar Ate And Ate...' by CoconutPalmDesigns

...It's Way Right Through The SAHM of Etsy Listings! For the SAHM of Etsy Treasury Challenge Featured Shop: MySweetPotato3 ( http://www.etsy.com/shop/MySweetPotato3 )


Girls Hungry Caterpillar Pho...
$38.00

Coffee Cozy. Reusable Earth...
$6.75

Baby Blanket - Urban Blooms ...
$35.00

Double Rosette Headband with...
$8.00

Autumn Leaves Tote Bag, smal...
$10.00

Girls Dress: Fuchsia Pink wi...
$23.00

Wide Fabric Headband in Fall...
$8.00

Pinwheel Hair Clip - Pink wi...
$4.50

Wrapped Leaf earrings

$16.00

Crochet Pixie Elf Hat - Brow...
$18.00

Organic Handmade Irish Baby ...
$40.00

Boutique Burpie Set in Pinks...
$12.00

Changing Pad Cover Green App...
$18.00

Baby Bib and Burp Cloth Gift...
$10.00

Hooded Baby Towel (Green wit...
$18.00

Pink Daisy Flower Headband
$4.50

Treasury tool by Red Row Studio.


~Steph~The Cuddle Corner~

Wednesday, November 2, 2011

Feature Shop: A Mother's Art

I hope you've enjoyed meeting the leaders of the team! Last, but certainly not least, I'd like to introduce you to team captain Rebecca of A Mother's Art and Olive Smiles. She's this week's feature shop, so keep reading to find out what inspires her and how she's dedicated to helping other small businesses succeed. Thanks for your hard work and dedication to our team, Rebecca! -Cori of Peace, Baby! Batiks.

What is your name?
Rebecca

Where are you located?
Princeton, New Jersey

Tell us a little about yourself.
I am, of course, a stay-at-home mom who loves using her free time creating art. My husband and I have been together for 10 years and have two beautiful children together. My husband's days are filled with being an aerospace engineer, and before retiring to became a mommy I was an assistant project manager in the real estate construction industry. Following my new love of art and photography, I've decided to go back to college to receive a degree in Fine Arts. 

What type of merchandise will shoppers find in your shop?
Stopping by my shop, you will find muted, soft colors of whimsical, imaginative wall art for children. I pull together an assortment of mediums to create scenes that can help children dream their own stories. I find peace in bringing square pieces of paper to life. It's my "me" time.

How/why did you get started?
When I found out I was having a little girl, I pictured her room full of pink, colorful flowers, butterflies, and all things girly. The room accessories I found in stores where expensive and did not meet my vision. I decided to try and carry out my idea by creating my own wall art. I stopped by an art store, picked up a canvas and some other art supplies, headed home, dug up some vintage paper from old books that were falling apart and created my very first piece. "A New Beginning."


How long have you been crafting?
I have been crafting ever since I could hold a crayon. My mother and aunt were very creative and always had fun projects to do.

What inspires you to create?
When I see certain color combinations together, hear songs like "Pure Imagination," or see inspiration from other artist, that is what gets my creative juices flowing. Music definitely helps warm up my imagination. The past few weeks I've been listening to "Mary Had a Little Amp," a CD made up of many artists brought together by Madonna.

What is one thing you need to have with you while you craft?
When I craft I always need a blank piece of paper and some colored pencils to draw out my thoughts. I also need to have time, since my craft can take hours, sometimes days or weeks.


What is your favorite thing to browse Etsy for?
I can get lost browsing Etsy, usually for nothing in particular. Getting hooked always starts with the front page treasury. I click on a box and it just pulls me in landing on one artist's favorites after another. It's amazing all that can be found on Etsy; that's why I love creating themed treasuries.  It's always fun and easy to fulfill since Etsy's artists sell everything under the golden sun.

When you're not crafting, what are you doing?
During my time when I'm not expressing my creative outlook on life, I am documenting it through photography. Photography has always been a love of mine, but not until I had children did my true passion emerge. My poor over-photographed children at times have to say "No cheese mommy"; that's when I know it's time to put a lid on it. One day my children will understand and thank me for all the beautiful photographs they will have to share with their families.

Where can we find you?
When I'm not documenting my family's every move or pulling colored paper together on canvas you will find me helping local handcrafting artists on www.OliveSmiles.com. I started a fun community of passionate artists looking to help other passionate artists build their brand. Olive Smiles is where artists come together to share skills and ideas from one another in order to push the handcrafting movement. Buy Local, Buy Handmade!


What is your favorite shop (not yours) on Etsy currently?
Browsing Etsy for years I have gained a whole new respect and love of the arts. It's amazing what people can create using their minds, their imaginations and their digits. Not only are their pieces amazing but their stories are as well, many hitting home which at times brings me to tears. I am so excited they found their passion and an outlet to share. One shop I feel is a favorite is Katie Daisy from "The Wheatfield." Mostly due to her energetic, youthful, feminine art and her story. I adore Katie's use of color, quotations and characters and how she wanders the country in search for inspirational stories to share on canvas. Take the time to fall in love and visit Katie at http://www.etsy.com/people/thewheatfield. You'll be glad you did!

Tuesday, November 1, 2011

Tutorial Tuesday - Customized Blog Tabs

Are you looking for ways to make your blog more attractive?  Check out these tips below on how to customize your blog tabs by  Lilly Bunns Boutique

Making customized blog tabs for your Blogger Blog

I used to see so many blogs with really cool page buttons for their blog.  But Blogger's standard buttons are just so boring!  I searched and searched for a tutorial to change them, but really didn't even know what search terms to use.  I eventually found a great YouTube tutorial that showed me how to do it.  Puglypixel uses Photoshop, so I thought I'd write a post on how I do it with GIMP.


1) Create your image.  I chose to make this banner for the handmade-ish look.  (it's about 900 by 100)  I suggest  looking to see how wide the width of the main background is on your blog (the white part on mine) and then going about 200 pixels less that that.

2) Separate the image to get each button.

  • Make a selection around the first button.


  • Click on Image> Crop To selection
  • Then save image as whatever file name you choose.  Make sure to save in a .jpeg, .gif, or .png file!

  • Now undo the "crop to selection" (crtl+z).  "Grab" the left side of the selection and move it to the right until there is a selection around the next button.  This makes sure that it crops right against the first crop so there are no spaces when we add the buttons to your blog.  Go to image>Crop to selection as before and repeat the entire process for each button.  Be sure to name them each differently!
3)  Now upload the pictures to your favorite photo hosting service.  I like Photobucket because it's easier to copy the links you'll need later, and do other cool things for your blog. (like the slideshow on Son Rise page)
4)  Next choose your blog from the blogger dashboard and click on the "pages" link.  Click on "New Page" and make the pages the way you want them (you'll have to do this for as many pages as you have).  Click "publish" as you would a regular post.  Beside "Show Pages As" be sure to 
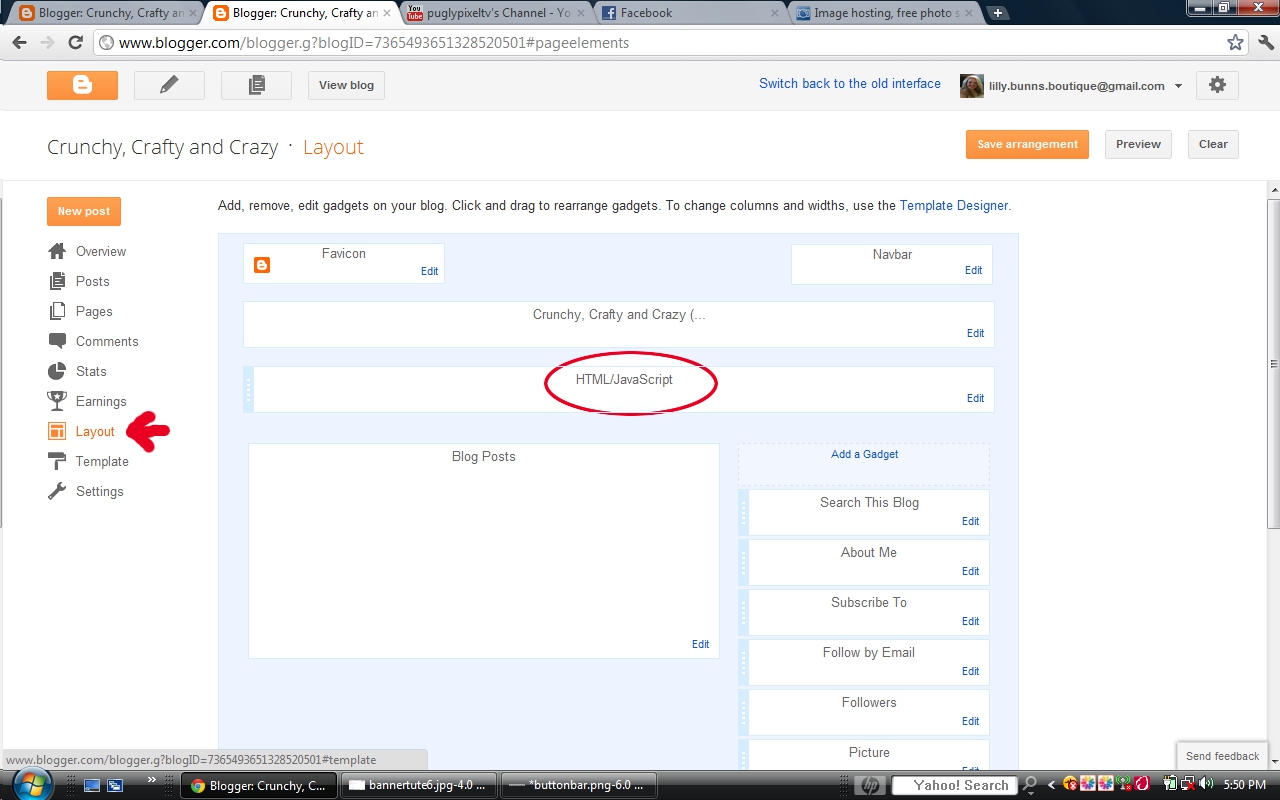
5)  Next Click on the "layout" link on the left.  Now choose "add a gadget" below your header.  (I've circled it, though mine says html/javascript) Choose an HTML/Javascript gadget.

6) Now you'll need to do some HTML in the box that just popped up.  I'm going to be generous and go ahead and give you the code.  Be sure to put YOUR information where it needs to be (red words for the page link [this is why you left the "pages" opened in another tab or window], the aqua words are for the photobucket direct link).  Copy and paste this code for as many pages as you have.  Make sure that the pages and the photo's match.  You don't want your home page to go to your about page!  DO NOT PUT A TITLE!!!
<a href="your page url"><img src="link to photo that corresponds to the page"/></a>

This is what my code looks like.
7)  Now click on Save and then Preview that page to make sure it looks right.  If the spaces are too wide between the button, or if you want more space, then add or take away line breaks (from hitting enter/return on the keyboard).  Once you get it looking right then click on the orange "save arrangement" button.
You now have a beautiful customized tabs bar!  You can also make this with just a normal looking button by just making one button (Like the buttons on the Not Just a Little Fat blog).  Save the button with the appropriate text on it.  All other steps are the same.  
 
 
Well, I hope you find this tutorial helpful!  Until next time, Happy November 1st! :) MegOri Girls Boutique
You might also like: